
So the hospital bed just got delivered (or the rental company dropped it off) and the manual is either missing, translated badly, or written for engineers instead of caregivers. Now you’re standing there with a remote control full of unlabeled buttons, wondering which one raises the head without launching your loved one into a sitting position they didn’t ask for.
Operating a hospital bed isn’t complicated once someone shows you where everything is. This guide breaks down how to use the remote control functions, adjust to different positions safely, and lock the side rails properly—whether you’re a family caregiver learning on day one or a new aide brushing up on protocol. We’ll also cover what to do during a power outage and how the CPR release lever works, because knowing that before an emergency happens matters more than knowing it during one.

Step-by-Step: How to Operate the Electric Hospital Bed
Most hospital bed pendants work on a simple principle: press and hold, then let go. You hold the button for the function you want until the bed reaches the position you’re after, then release. The bed stops exactly there.
Step 1: Identify your core buttons.
Nearly every pendant has three basic functions:
Head Up / Head Down: raises or lowers the back/head section
Foot Up / Foot Down (sometimes labeled Knee Up / Knee Down): adjusts the lower-leg section
Bed Up / Bed Down: raises or lowers the entire bed height (full-electric models only)
On bigger pendants, the 10-button versions, these are grouped logically: head controls first, foot controls next, then height and any bonus modes.
Step 2: Adjust foot before head.
This one trips people up. If you’re moving someone toward a sitting position, raise the foot/knee section first. Raising the head alone creates a downhill slope toward the feet, and the patient slides. Bringing the thighs and hips up first gives them something to brace against. Some beds skip this manual sequencing entirely with an Auto Contour button that moves head and foot together. Drive Medical’s manual highlights this exact feature.
Step 3: Use Trendelenburg only if your bed has it.
Not every pendant includes Trendelenburg or reverse Trendelenburg. It’s often a separate, model-specific function, with angle ranges varying widely. Some beds cap at 14°, others go up to 18° in either direction. The Stryker Spirit Plus, for example, includes dedicated TREND and rev.TREND buttons alongside its standard head/foot/bed controls. Basic patient-facing pendants usually skip this feature entirely.
Step 4: Hold, don’t tap.
Intermountain’s patient training materials say it plainly: press and hold HEAD or FOOT for section movement, hold BED for height. Tapping won’t do much. Holding gets you there.
How to Manually Adjust a Semi-Electric or Fully Manual Hospital Bed
Manual hospital beds and semi-electric hospital beds use hand cranks instead of buttons. Once you know where they are, adjusting the bed takes seconds.
Find the cranks first. They’re usually tucked at the foot end, below the mattress and above the bed springs. Some models use a three-crank layout: one for the head/back section, one for the foot/leg section, and one for overall bed height (hi-low). Left crank often controls head elevation, right crank controls foot elevation, and the center crank handles height. But check your bed’s label to confirm.
Most manuals follow a simple rule: clockwise raises, counterclockwise lowers. But some emergency manual cranks reverse this: clockwise lowers, counterclockwise raises. This is the single most common mix-up caregivers report. Don’t assume your bed matches the last one you used. Check the sticker on the frame before you start turning.
To adjust manually:
-
Confirm the bed is unplugged or in manual mode.
-
Insert the crank into the correct socket for the section you’re adjusting.
-
Turn slowly and continuously. Don’t yank or force it.
-
Slow down as you approach your target angle to avoid jolting the patient.
When you’re done, remove the crank completely. Store it in the designated bracket, clip, or bedside drawer. Never leave it protruding from the bed frame. That’s a tripping hazard, especially in tight hospital rooms or home hallways with wheelchair traffic.
Manual beds suit budget-conscious, low-frequency adjustment scenarios. Semi-electric beds split the difference: head and foot move electronically, height stays manual. Full-electric beds handle everything, which is why institutions with frequent repositioning needs typically choose them.
Bed Side Rail Operation: Raising, Lowering & Locking Correctly
That click you hear when raising a side rail is the difference between a locked rail and one that looks locked.
Raising the rail (plunger pin style):
-
Lift the rail to your target height.
-
Push or lift until you hear the click—that’s the pin dropping into the lock hole.
-
Release the pull-tab and let it spring back.
-
Tug the rail gently to confirm it holds. No click, no lock. Try again.
Lowering the rail:
-
Hold the top of the rail with one hand.
-
Pull the release knob (index plunger) with the other.
-
Lower slowly, don’t drop it.
-
Check the pin has reset once the rail’s at its final position.
Side rails should stay up when fall risk is high, patients are confused, or nighttime repositioning is unpredictable. Keep the bed at its lowest height and lock the casters. Lowering temporarily for transfers or care tasks is fine, but relock immediately afterward.
One caution: the FDA classifies rails as physical restraints when the goal is preventing a patient from leaving the bed voluntarily, not managing symptoms. Assess need before defaulting to “rails always up.”
If a rail won’t lock, raise it fully, drop it fully, then retry. Still loose or clicking inconsistently? Check for mattress mismatch, bent guide rails, or a stuck release button. A rail that opens with light pressure is a maintenance issue, not a technique problem. Pull it from use and inspect. Many facilities schedule this check every six months.
Emergency Power Failure Procedure: Using the Manual Crank
Power outages don’t pause patient care. When an electric hospital bed loses power mid-adjustment, the manual crank is your only option, and using it wrong can hurt someone.
First, unplug the bed. Stryker’s manuals are explicit: disconnect the power cord before touching the crank. If power returns while you’re mid-crank, the motor can suddenly engage and spin the handle. That’s a real injury risk.
Now find the crank. Location varies by brand. Under the mattress near the foot end—Mayo, Providence, Trinity, Medline, and Invacare beds store it in the spring deck or link fabric. On some Stryker models, it’s at the head end instead. Check your bed’s label if you’re not sure.
Clockwise usually raises, counterclockwise lowers. That holds for head, foot, or overall height adjustments on most models. A few units reverse the logic, so confirm against the frame sticker before you crank.
During an outage, most beds let you manually adjust only the Fowler (head/back) and Knee Gatch sections—not the full bed height. Keep the patient in a stable, semi-reclined position rather than repositioning repeatedly while you wait for power. After any adjustment, check the side rails, brakes, and patient alignment to rule out slide or fall risk from the new position.
Some full-electric beds carry a backup battery capable of roughly 10 additional function operations. That can bridge you through a short outage without touching the crank at all.
Quick SOP:
-
Confirm patient is stable; call for help if needed.
-
Unplug the bed.
-
Locate the crank (mattress area or head end).
-
Insert and turn slowly after confirming direction.
-
Adjust only what’s needed; avoid over-cranking.
-
Remove the crank, store it, and switch back to electric controls once power returns.
CPR/Rapid Flat Position Release: What Caregivers Must Know
Cardiac arrest doesn’t wait for you to find the manual. When a patient needs CPR, the hospital bed’s Trendelenburg position or head elevation has to disappear instantly, and that’s what the CPR release mechanism does.
Where to find it varies more than you’d expect. Manufacturers scatter this control across different locations:
Two red handles under the sleep deck at the head end
Handles under the backrest section, one per side
A release under the seat section, beneath the litter top
Handles below the calf section on some models
There’s no universal spot. Check your specific bed model before an emergency, not during one.
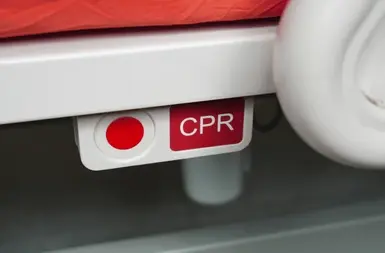
Button vs. lever: know which one you’ve got.
Some beds use an electric button labeled “CPR,” “Flat,” or “Bed Flat” on the hand control or side panel. Press and hold. The bed flattens automatically, and on some models it drops to a low height of roughly 250 mm (9¾ inches) at the same time. That combo matters in a home setting where you need both flat positioning and easy access for chest compressions or transport.
Other beds use a mechanical lever release: red handles on either side that you pull to manually drop the backrest. This skips the electronics, which is the point. Power failure won’t stop it.
Some models include both a mechanical CPR handle and an electric Flat button. Don’t assume; verify.
No fixed timing. Just hold until flat.
Manuals rarely give you a countdown. Hold the button or pull the lever until the bed reaches full flat position. Release, and it stops wherever it is. That’s the standard training cue clinicians use.
Who needs this feature prioritized:
Patients with cardiac history (heart failure, coronary disease, prior arrest)
High aspiration risk (tube feeding, stroke recovery, neuromuscular conditions)
Long-term bedridden patients with limited overnight supervision
When comparing beds, ask whether release is bilateral (either side works), whether it requires raising rails first, and whether it drops height simultaneously. These details separate a useful emergency feature from one that just sits there.
Safety Checklist for Hospital Bed Use
A locked bed rail or an engaged brake means nothing if nobody checks it. Skipped daily checks cause most hospital bed injuries, not equipment failure. Build this into the routine and you catch problems before they turn into incidents.
Run through this every shift:
Brakes and casters: Lock them, then nudge the bed. It shouldn’t budge.
Side rails: Raise and lower each one. Confirm the lock clicks and holds under a light tug.
Cords and cables: Trace the power cord and handset cable. No fraying, kinks, or pinch points near the caster wheels.
Handset function: Test head, foot, and height adjustment. Buttons should respond without delay or sticking.
Mattress support: Slide a hand under the patient’s sacrum or heel. If you feel the bed frame through the mattress, it’s bottoming out.
Skin check: Look at sacrum, heels, elbows, shoulders, and ears after every repositioning. Redness that doesn’t fade signals a pressure problem.
Repositioning schedule: If the patient can’t reposition themselves, confirm they moved within the last 2 hours.
Head elevation: For high-risk patients, keep it at 30° or lower. Some protocols cap time above 30° at 2 hours max.
If a rail won’t lock, brakes slip, wiring is exposed, or a handset goes unresponsive, stop using the bed and report it immediately. These aren’t wait-and-see issues.
Conclusion
Operating a hospital bed comes down to three things: know your remote’s buttons before you need them in a hurry, treat the side rails, casters, and brakes like the safety gear they are, and always locate the CPR release lever before an emergency. Whether you’re caring for a family member at home or settling into a new shift at a facility, that muscle memory is what separates confident caregiving from panicked guesswork.
Print this guide, tape it to the wall near the bed, and walk through each function once with the patient present so everyone’s on the same page. If your current setup still feels clunky or unreliable, it might be time to look at a bed built with caregivers in mind. Browse Gracemedy’s hospital bed lineup and see what smoother, safer positioning actually feels like.